Had my first experimenting with slip casting today and another good talk with Dom and Andy the two technicians down in the 3D workshops. Took some photos along the way to show how it's all done!
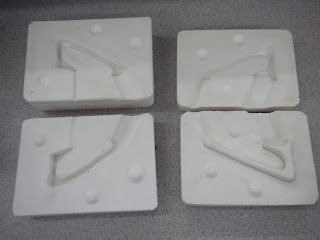
Slip casting moulds can be made up of several parts. It's easier and more convenient to do the handle moulds separate, then you can change the handle style, and it's easy to fix before firing.
Handles are made in solid moulds - fixed together & poured into the 'gate' (big gap) til it fills the mould and rises to the 'sprew' or 'whistle' (smaller gap)

The liquid clay slip is poured into the constructed moulds. The plaster moulds absorb moisture from the clay, and after 5-15 minutes, (depending on how 'mature' the mould is), the slip can be poured out leaving a 'skin' on the inside of the mould.

The slip is left to dry out a little and then removed from the mould, 'fettled' and finally left to dry.
My first 'cup'!! Started to manipulate the shape a little:
My first handle!
Trying out a different cup mould...
This was a great experience to start to understand how the slip clay can be used, although I did find it difficult to make a truly 'handmade' piece considering the whole process is a very industrial standard technique. I need to establish my direction and make sure I know more specifically what I want to come out with - an individual yet 'functional' range of items, or something very bespoke, handmade and for 'display purposes only'?
After talking again to Andy and Dom, I've got a few more ideas lined up and I still want to continue playing around with the process of ceramics/pottery/firing & glazing, as much as I need to know my direction, I still have enough time to play around with materials a little more, get used to it all and continue working on my textiles and illustrations in the back ground as well.


No comments:
Post a Comment